
Are you ready to embark on a crafting adventure that combines cuteness, creativity and construction?
If so, I have an exciting project to share with you today that's sure to make your heart skip a beat!

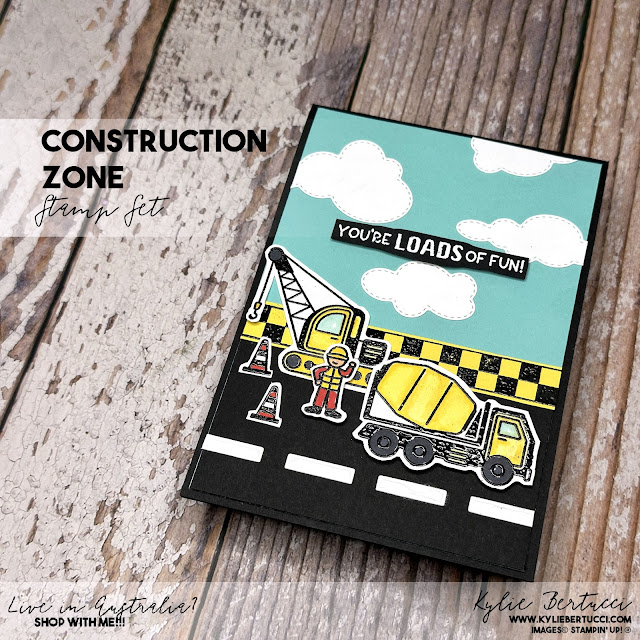
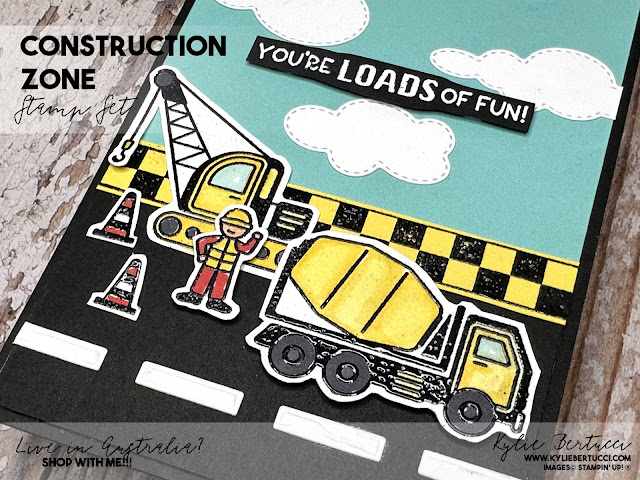
The main stamp set used on this project is the 'Construction Zone' stamp set by Stampin' Up! However, the clouds are from the 'Give It a Whirl' die collection, and the bold check 'hazard tape' from the 'Supremely Awesome' stamp set (yes, the Pizza themed stamp set). With a touch of embossing magic and some vibrant coloring, this project will leave you with adorable construction-themed cards that are perfect for a variety of occasions.
Would you like to make this project?
Materials You'll Need:
Step-by-Step Guide:
Showcase Your Creativity:
I loved pulling together all of these different elements from a number of stamp sets and die collections. I would love to see what you create. So, gather your supplies, unleash your creativity, and get ready to construct some seriously cute cards that will leave a lasting impression. Don't forget to snap some photos of your crafting journey and share them on social media to inspire others to try out this delightful project!


Materials You'll Need:
- Construction Zone Stamp Set by Stampin' Up!
- Give It a Whirl Die Collection (for clouds)
- Supremely Awesome Stamp Set (for hazard tape)
- Versamark Ink Pad
- Black Embossing Powder
- Stampin' Blends (various colors for coloring)
- Scissors, Adhesive etc.

- Card Base and Layer: Start with a Basic Black card base and add a layer of Pool Party for the sky and Basic Black for the road base.
- Stamp and Heat Emboss: Begin by stamping the cement truck, crane, little man, and witches hats from the 'Construction Zone' stamp set onto a sturdy cardstock using Versamark ink. Sprinkle black embossing powder over the stamped images and tap off the excess. Heat emboss the images using a heat tool until the embossing powder is melted and glossy.
- Colouring: Once the embossed images have cooled down, it's time to bring them to life with colour! Use Stampin' Blends in your chosen shades to add vibrant hues to the cement truck, crane, little man, and witches hats (I used Daffodil Delight, Basic Black, Pool Party and Poppy Parade). The alcohol-based markers will give your images a smooth and seamless look using both light and dark to blend.
- Fussy Cutting: Carefully cut out the coloured images using scissors. Take your time to ensure precise cuts, especially around intricate details.
- Cloudy Skies: Die-cut clouds from the 'Give It a Whirl' collection using a Stampin' Cut and Emboss machine. These clouds will add a whimsical touch to your construction-themed scene.
- Road Lines: You may be thinking 'What are the broken lines on the road?' Good Question! This is actually a sentiment die from the Wonderful Thoughts die collection.
- Hazard Tape Accent: Stamp the bold check 'hazard tape' from the 'Supremely Awesome' stamp set onto a piece of Daffodil Delight Cardstock using Versamark ink and heat emboss using Black Embossing Powder. This tape will create a striking border and add a pop of color.
- Assemble the Scene: Arrange your coloured and fussy-cut construction elements on the cardstock, creating a playful construction site scene. Add the die-cut clouds to the sky for an extra touch of charm.
- Finishing Touches: Complete your card with the sentiment. This is stamped onto Basic Black cardstock and white embosses. Fussy-cut and adhere to card.

I loved pulling together all of these different elements from a number of stamp sets and die collections. I would love to see what you create. So, gather your supplies, unleash your creativity, and get ready to construct some seriously cute cards that will leave a lasting impression. Don't forget to snap some photos of your crafting journey and share them on social media to inspire others to try out this delightful project!
Would you like to add any of the products used on todays project to your crafting collection, please click on the shopping links below.
Product List
 $68.00 | |||
 $17.50 |  $17.50 | ||
 $32.00 |
")
")
")


Thank you so much for stopping by!

12 amazing tutorials to inspire you each month
$20
Click Below to see the Sneak Peeks
or


No comments
Thanks for making the time to write a comment - you have made my day